Grill lights by the puddle light guy

Joined
Oct 5, 2023
Messages
673
Reaction score
1,893
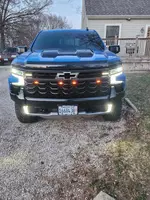
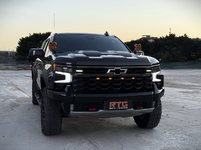
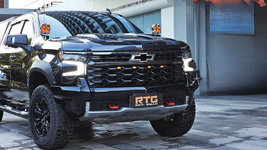
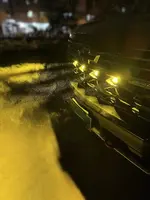
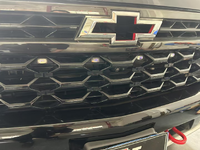
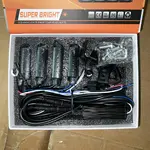
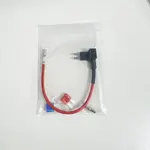
I just finished adding the 'upgraded grill lights' from RTGOffroad to my truck, they fit and turned out very well. @Mixander Xi now has 3 different types of lights available, he has the orange marker lights, they look good but I was looking for some extra illumination and not just a marker, these ones are white, or yellow, or both white and yellow at the same time, they strobe if you want and can be mounted in the 3D printed mounts one way or flipped 180 degrees to either have the white on top or the yellow on top. I chose to go with yellow on top and run that during the day, so the white is on the bottom and I run that at night, I was afraid if I turned them over that the white light would be too high and blind oncoming cars, they are fairly bright. When I looked around to compare some of Mixanders products to make sure I was getting a decent deal I found he sell this stuff much cheaper than others, he feels like he should keep his profits low and make up for it with more sales so that these products are available to more people, which is a rare breed indeed! Last he is getting ready to release a set of the upgraded grill lights that add red to the yellow and white set, it won't do red at the same time as the white and yellow but they can strobe the red also if you want them to with the push of the remote control fob button. There is a metal bracket attached to the fob that I didn't want, so I removed it and found the remote sits perfectly in the pen cubby in the console. The lights won't come on automatically, you need to hit the remote button, but I did use the fuse tap to connect to fuse 46 so that when I turn off the truck the lights go off, I just need to get used to turning them on when I start the truck, I am adding it to my startup checklist, start, Sport Mode, Auto Stop off, and turn on the grill lights to yellow during the day and white at night. I really appreciated the 3D printed mounts, they fit tightly in the grill so they will not come out easily, it took some pressure to get them in, but they aren't coming out!

Pics to come!


Thank you, my friend! Here are some post-installation photos for reference.
 

Attachments

  • att.7gtd6A9f9B9A4psfde6PSJa2UmY8jIl0pgM3TmAOLdY.webp
    att.7gtd6A9f9B9A4psfde6PSJa2UmY8jIl0pgM3TmAOLdY.webp
    316.9 KB · Views: 23
  • att.ohDPVkw4o3qQaxfz-7D_SnFoAzE8P-kp7rtmTZOp2Lc.webp
    att.ohDPVkw4o3qQaxfz-7D_SnFoAzE8P-kp7rtmTZOp2Lc.webp
    196.5 KB · Views: 23
  • e1d71193198c6852f640d8d8fd853ac4.webp
    e1d71193198c6852f640d8d8fd853ac4.webp
    696.2 KB · Views: 21
  • 84c9d4ed1e4161f97916683e2fc14941.webp
    84c9d4ed1e4161f97916683e2fc14941.webp
    1.1 MB · Views: 22
  • 4e4d73d12ac4f4496404562a51b27aca.webp
    4e4d73d12ac4f4496404562a51b27aca.webp
    109.8 KB · Views: 22
  • IMG_1919.webp
    IMG_1919.webp
    819.2 KB · Views: 21
  • e4c1546396715c5b8028efa924a9aef2.mp4
    19.4 MB
  • 73546adde3be65fcf68c931ce4f28f0f.webp
    73546adde3be65fcf68c931ce4f28f0f.webp
    99.1 KB · Views: 21
  • 4b0d0decfc7a0871582325ca14c88738.webp
    4b0d0decfc7a0871582325ca14c88738.webp
    149.2 KB · Views: 21
What's the electrical hookup? Plug and play or splice?
Here are the connectors for both grille light models. I'll include ZR2-specific M2 power taps and fuses - installation will be extremely straightforward.
 

Attachments

  • 0.webp
    0.webp
    514.3 KB · Views: 4
  • 58a1364c-ba26-4b6e-8439-0389948552a9.webp
    58a1364c-ba26-4b6e-8439-0389948552a9.webp
    75 KB · Views: 4
  • 72f6695f-4c8b-4e22-9a47-46cae3914657.webp
    72f6695f-4c8b-4e22-9a47-46cae3914657.webp
    300.9 KB · Views: 5
will these fit ZR2 HD grill?
Hi @ODAVE, unfortunately no, he cannot get ahold of a 2500 ZR2 grill yet to create the 3D printed mount, there are not very many 2500 models at all in China, so it is hard to figure this one out easily. I know he wants to, but has not been able to yet. Hopefully in the not to distant future he can get a grill piece to design it. I am looking for a wrecked 2500 to get a section of the grill to send to him for design and testing.
 
What's the electrical hookup? Plug and play or splice?
Hey @bobo57, there is no splicing to speak of, they work completely independant so they do not wire in to existing cables. There is only 3 wires to be attached, 1 to ground, and 2 to power, the supplied fuse tap allows you to hook the power to fuse 46 (power available at ignition time) but then you need to use the supplied remote to turn them on each cycle and to pick between yellow or white, but if it is hooked to fuse 46 instead of directly to power, say at the battery, then they will go off when the truck is stopped. Let me post a couple pics for you.
 
Here are some pics of my install, any specific questions just let me know. One thing, the wires aren’t real long, I had to add a piece to the ground cable to reach the grounding lug using a splice, and you have to splice the power to the fuse tap if you choose to go that route, which I would for reason stated above about shutting off the lights when the truck is stopped, if it is spliced over to the battery you would need to remember to shut it off each time also and it could kill the battery otherwise.

1745561920822.webp


1745561966012.webp


1745562018505.webp


1745562051537.webp


Disregard the blue wire, I just haven’t trimmed it to length yet. And you would want to notch out the fuse box and lid for the wires probably.

1745562125786.webp


Here is my extension to the ground lug, easier than trying to get to the battery ground for me.

1745562247887.webp
 
Last edited:
Here is the remote, once you remove the metal bracket on it it fits very nicely in the pen holder cubby on the console, I also had to turn it 180 degrees from this pic since the emitter is on the other side, otherwise it can be intermittent, but once I spin it around it has worked 100%


1745562465020.webp
 
Here I went through the different modes after the install. Hopefully you can pull and see this video from my iPhones iCloud.

 
As a couple final notes from my install, I didn't remove the grill completely, that would have been a waste of time, so once loose I just leaned it forward away from the shutters so I could work. I laid a couple thick towels on top of the bumper between the bumper and the grill to keep the grill from scratching the bumper while I worked, and I used a small short bungee cord to hold the grill leaning forward so it didn't fall to the ground while I was working.

Last but not least, I found it a lot easier to pull the bottom loose before working on the middle clips on the 2 sides, and the grill is sharp in the back when you reach through the openings to grab and pull the bottom and middle free, there are a couple hand hold places if you feel along the bottom grill edge near the side edges that worked really well, and I used a couple microfiber towels in my hands to keep from slicing myself open since the back side of the openings is kinda sharp as I reached through the openings to pull the middle, you could also use some gloves instead, but I used a couple of small towels. They didn't cover these small thIngs in the video, but I learned them as I figured out how to remove the grill without damaging it.

Hope this all makes some sense.
 
Last edited:

Latest Posts

Back
Top