HD Front Lighting, Mount, and Switching Planning - Non-Bison OEM Bumper

GATORB8

Active member
Joined
Oct 8, 2024
Messages
119
Reaction score
223
Location
CLT, NC
Figured I'd start a thread separate from my build thread everyone can use to bounce ideas off each other. Feel free to thread jack, or berate me as I brainstorm.

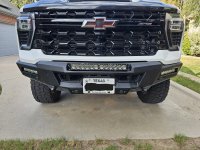
At least for now I've grown attached to the stock non-bison bumper. Real hope is that an effective hidden winch mount will come out.

For the front end, I'd like to add driving lights, preferably with SAE compliant beam patterns, and maybe some other available patterns if I do more than a pair. Out of the 12 KCs on the font half of the Jeep, we get by far the most use out of our bumper mounted Pro6 driving combos, both on and off road. Ditch lights are second most used, but I'll probably skip those on the truck. Our roof/windshield mounted Pro6 bar has been used very rarely.

While they work, I'm very open to different brands since the 2 LED reflector based Pro-6s definitely leave some to be desired on the foot candle/lux side. No specific interest in integrated running lights, if I'm forced in, I'll leave them disconnected. Personal preference I want a pod/assembly style instead of a "light bar".

Light brands: Looking at BD, KC, and potentially Morimoto and Nacho at this point. Scratched Diode Dynamics and all the "also does podlights" brands for now. Tyri doesn't really match the aesthetic.

Location/Mounts: I'm really down to two at this point, bumper mounted in front of the grille is most likely, secondary would be the lower grill between the tow hooks. Don't want any behind the grille setups. Avoiding pillar mounts unless I do ditch lights at some point.
  • Lower Grille:
    • I did find a guy on the FB group that cut the center of the grille out and was able to top mount a 20" BD bar using the included brackets flipped upside down.
    • 1730304367500.png
    • Potential lights for this would be a 20" Flex Era KC set of Flex Era 1s (I realize this looks basically the same as a bar), or a set of 5 ganged Morimoto 2 bangers (wide, drive, spot, drive, wide)
  • Bumper:
    • Can't believe the limited bracket support on these. Basically the Wescott is the only one available, and it's expensive and I don't like the projection in front of the bumper. I'm no master fabricator, but I've got a decent tool box for fabbing some up. Right now, I'm wondering if the right way to go isn't to just drill the top of the bumper and drop in some rivnuts. I don't see anything really preventing that looking at ebay shots of the back of the bumper.
    • Once I finalize mounting, I'm gathering dimensioned listings for the lights I'm considering. Really would like them to tuck back into the grill a bit if I can get them above the body colored piece that protrudes a bit. Planning single pair.
      • Candidates: BD LP6 or 9, KC Titan, Nacho Grande, Morimoto Bigbanger.

Still early on the switching side and haven't done much reasearch. Will look at upfitter, Spod, Switchpros. I didn't have the upfitter option since I grabbed an order, not sure it can be retrofitted.
 
I have heard some industry interviews with the Nacho guys, but the more I look at them the more I like them.

Never even saw their mounting solution built into their lights. They come with standard brackets, but have built in capability to be bar mounted to 1.5" tube, pretty slick:

1730317876041.png


Grande dims, only manufacturer so far thoughtful enough to dimension off of the mounting point.:
1730317943376.png
 
Not going to work --- I tried to do it. Garbage front bumper has a curved thin metal outer and directly below with a small gap is thicker piece of reinforcement. Been there done that and it is a waste of time.

Was forced to go with this.
 

Attachments

  • Truck Bumper.JPG
    Truck Bumper.JPG
    519.1 KB · Views: 42
Not going to work --- I tried to do it. Garbage front bumper has a curved thin metal outer and directly below with a small gap is thicker piece of reinforcement. Been there done that and it is a waste of time.

Was forced to go with this.
Was the thicker reinforcement flat? Could I not oversize the hold in the skin, then drop a rivnut in the reinforcement?
 
  • Like
Reactions: AXE
In todays edition of "Why Is This Idiot Spending So Much Time Analyzing This?"... I present dimensions and pricing.

Front clip:
1730390692053.png


Pricing:
1730397754579.png


Dims:
  • KC Hilites
    • Pro6
      • 1730390242221.png
    • Titan
      • Requested
  • Nacho
    • Grande
      • 1730390375160.png
  • Morimoto
    • Bigbanger
      • 1730390420545.png
  • Baja Designs
    • LP6
      • 1730390640413.png
    • LP9
      • 1730390470092.png

EDIT: Was able to find a discount on the Nacho's
 
Last edited:
So, the wheels are a'turnin.

I'm really digging the Nacho lights. Built in relays, SAE function plus high output driving function (three setting switchable), magnet programmable of eight modes to the three functions, full 180* surface mountable plus the 1.5" through bar. All while being in the LP6/HXB price and performance range. Lifetime warranty.

Note, they are now teamed with ARB as a light partner.

The Nacho rep I chatted with has a 1500 babymax and is expecting a prototype mount from LM1 shortly after SEMA. May hold tight and see if we can get an HD version from them.
 
The bumper on the HD is curved and the heavier metal about .25 or a little more at the pinnacle of the curve is under the thin painted top. It has no structural ability. This means if you try and add light even by drilling through all of the metal when you tighten down the mounts the thin metal will pull down to the more substantial layer underneath. It will be a nightmare to keep tight enough to keep from moving not to mention look like ass.
 
The bumper on the HD is curved and the heavier metal about .25 or a little more at the pinnacle of the curve is under the thin painted top. It has no structural ability. This means if you try and add light even by drilling through all of the metal when you tighten down the mounts the thin metal will pull down to the more substantial layer underneath. It will be a nightmare to keep tight enough to keep from moving not to mention look like ass.
To clarify, I meant oversize the skin hole to allow a bushing/spacer to pass through it. Then rivnut the heavy part. Run a bolt or threaded rod in the rivnut with a spacer to hold the bracket. Nothing would touch the skin.
 
  • Like
Reactions: AXE
To clarify, I meant oversize the skin hole to allow a bushing/spacer to pass through it. Then rivnut the heavy part. Run a bolt or threaded rod in the rivnut with a spacer to hold the bracket. Nothing would touch the skin.
I understand now but would take access to some detailed drawings of the bumper assy to determine imho. Would not be for me.
 
  • Like
Reactions: AXE
So, the plan has evolved a little.

I've decided on a pair of Nacho Grande SAE. Unfortunately the 10% off sale at Poly Performance is gone, so now I'll need to wait for someone to run a Black Friday sale on Nacho. Plan to get the pair and their Grande harness, although I don't plan to use their switching. Still haven't spent much time on switching, but the plan would be to fire the SAE Low function with the high beams and potentially add a on/off relay over ride for that. Will do a second input for the high function. Could potentially do a third function tied to the cargo light circuit.

Now, for mounting, which should turn out pretty trick if I can get the vision in my head to work.

Part 1: GODZ Mfg hidden light bar mount. Damn thing is out of stock, and they haven't responded to me on the site or IG yet. If that doesn't change I may have to fabricate it.

Part 2: Fabricate an adjustable cross bar that links the two light bar mounts, basically make a mounting surface that simulates how the light bar would normally sit in these. If I do the Godz, it's stainless, so I'll probably get this made in stainless and powdercoated through send-cut-send.

Part 3: Because I can rear mount the Nachos, I'll install the Nacho brackets behind the grille with the tabs sticking through (pointed forward). Reinstall the factory grill, then mount the lights. The tabs of the brackets should basically give me a mounting tab in the center of two adjacent openings.

This give a no-cut, no drill install, and it should get the front face of the light housings as close to the front edge of the bumper (vertical plane) as possible. I need to confirm that I will be able to miss the camera sight line if I put them far enough out and down. I'll need to fabricate a headlight T-Harness (think similiar to @Pod Holes rear harness) to pull the high beam signal.
 
Last edited:
  • Lower Grille:
    • I did find a guy on the FB group that cut the center of the grille out and was able to top mount a 20" BD bar using the included brackets flipped upside down.
    • View attachment 17445
I have to assume he removed the entire front bumper assembly to do this, if he had a Duramax...Because there is an air scoop that is in the way of accessing the lip that you would need to drill for the brackets.
 
How did you mount those pods? Having them there for awhile, any issues with the grill cracking from the added weight?
I used simple heavy gauge 90 degree corner brackets for the light bar and drilled holes in the bracket to line up my spacing. They are then mounted to the thicker plastic between the waffle openings in the grille. The ambers (pod lights) use the factory bracket the came with. I cut metal mending plates and epoxied them in the grooves behind the waffle opening. Lines up perfect to make a flat “floor” plate to bolt the light bracket. I did have to cut out inside the waffle opening (they narrow as the go back) to fit the lights back flush to the grille. All told it took me 1/2 day so not too big of a job. Just gotta commit to cutting :) My original plan was to put the duallys below the headlights but I got tired of waiting on the pod mount guy so I just did it this way. Zero issues with cracking or stability. The grille is pretty heavy gauge plastic. The pod lights aren’t heavy and the light bar mounts in the center between the waffles that is thick.
 
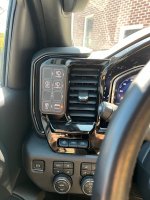
Made a call on switching. Was a tough decision, but I went with the Auxbeam AR-800 - Updated version, at least if the right one shows up.

Solid state relays, under hood power distribution center, and a single cable into the cab for the panel. Wanted it to both dim and match the factory backlighting, note, I'll RGB the backlight to match the factory white, not f'in purple. I normally wouldn't have considered it, but Auxbeam is being used by several others manufacturers at this point (whether or not they acknowledge it) including Go Rhino and Bulletpoint. I'd prefer the Bulletpoint version if it wasn't the blue back light entry level setup. $230+tax shipped.

1731452551471.png
1731452843374.png


I considered the 404parts factory kit, but after watching some videos, I don't like that the kit leaves the Aux wires in the footwell, may be missing the fifth output, and, too be honest, looks like an aftermarket stick on anyway.

Switch pros and Spod didn't inspire me to spend double+ the cash. SSV Switchworks, over $1k?!?. Scoshe digital panel in the price range could be interesting, but I just refuse use a brand I specifically remember first seeing in the car audio aisle at Walmart.

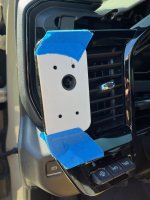
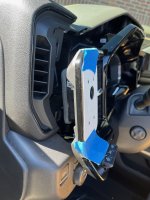
I'm considering two mounting options in the cab, under the HVAC controls similar to factory upfitter, or to the left of the door side driver dash vent on the flat piano black trim. Would use the Proclip 805993 mount there to keep from screwing up the panel:

1731452443803.png
 
Made a call on switching. Was a tough decision, but I went with the Auxbeam AR-800 - Updated version, at least if the right one shows up.

Solid state relays, under hood power distribution center, and a single cable into the cab for the panel. Wanted it to both dim and match the factory backlighting, note, I'll RGB the backlight to match the factory white, not f'in purple. I normally wouldn't have considered it, but Auxbeam is being used by several others manufacturers at this point (whether or not they acknowledge it) including Go Rhino and Bulletpoint. I'd prefer the Bulletpoint version if it wasn't the blue back light entry level setup. $230+tax shipped.

View attachment 17741View attachment 17742

I considered the 404parts factory kit, but after watching some videos, I don't like that the kit leaves the Aux wires in the footwell, may be missing the fifth output, and, too be honest, looks like an aftermarket stick on anyway.

Switch pros and Spod didn't inspire me to spend double+ the cash. SSV Switchworks, over $1k?!?. Scoshe digital panel in the price range could be interesting, but I just refuse use a brand I specifically remember first seeing in the car audio aisle at Walmart.

I'm considering two mounting options in the cab, under the HVAC controls similar to factory upfitter, or to the left of the door side driver dash vent on the flat piano black trim. Would use the Proclip 805993 mount there to keep from screwing up the panel:

View attachment 17740
IMG_0391.jpeg
 

Most Member Reactions

Back
Top