Upfitter Switches

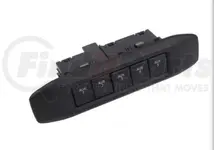
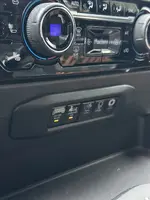
Upfitter switches! So, I figured I'd share just in case anyone was looking to add these to your ZR2. Gm doesn't offer any upfitter switches for the refresh. I needed to add some switches and really wanted the factory look of the upfitters. Slapping a generic toggle or rocker on this new fancy dash didn't seem right. I also really wanted the fuse block kit that comes with the kit as well as the terminals for the battery box under the hood.

So I figured I'd take a gamble and give it a try. Found a relatively cheap kit on ebay. Wrong color which doesn't matter cause the dash panel diffenitly wasn't going to work on a ZR2. The kit was around 200.

The wiring is almost plug in play. All the components plug in and bolt up just like the previous years minus the dash panel of course. The one hick up on the wiring is the ignition wire and the back lighting wire are missing from the 14 pin plug under the dash. Same connector, just is missing those pins. Pin 3 (yellow wire) is back lighting and pin 13 (violet) is ignition wire.

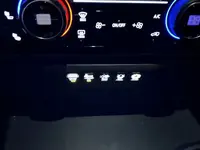
All I did to resolve that was run an ignition wire over to the harness and clip it into both those wires on the upfitter harness. The other issue is mounting location for the switches themselves. I ended up adding some length to the switch harness and mounting my switches in the center console under the climate controls. That just seemed to be the best spot where it fit and I only had to cut into a single trim piece.

It's diffenitly not just plug and play, but it's not to hard. Love the fact the switches match the factory look. I also how clean it makes the connections under the hood in the battery box. The 4ga wire there where the plow connection would be is for my on-board air compressor. HTH!
Part numbers or more description of the part thanks a bunch
 
Part numbers or more description of the part thanks a bunch
A kit similar to this. You can search around for the best price. But around 180 is what I paid. Comes with all the parts you need other then some wire.
 
Note: The above post contains a link to eBay or Amazon. As an affiliate partner ChevyZR2.com may receive a commission from the sale.
A kit similar to this. You can search around for the best price. But around 180 is what I paid. Comes with all the parts you need other then some wire.
Got it Thank you
 
Note: The above post contains a link to eBay or Amazon. As an affiliate partner ChevyZR2.com may receive a commission from the sale.
How difficult was the install on this?
Hard to say I guess. I don’t think it’s very hard. It was a bit of work when I did it because I didn’t know if it would work, if the wiring was the same or even where/if the switch would fit. I think if going in to it knowing the plug under the dash is the same and only 2 wires on the plug are different and which two at that. Also knowing where the switch will fit. should make it easier. Everything under the hood connects just like it would on a 21 model. So you can literally follow the instructions on that part.

but you do have to remove a few dash panels. you also have to cut a hole for the switch and you have to extend the wire harness for the switches themselves. So it’s not just plug and play. but I’d say anyone who has installed some aftermarket lights before could handle it. I should have taken more Pictures as I was doing it. I really didn’t know if it was even going to work though, lol.
If anyone gets in to it and has trouble, just ask and I’ll try to help you out best I can.
 
Upfitter switches! So, I figured I'd share just in case anyone was looking to add these to your ZR2. Gm doesn't offer any upfitter switches for the refresh. I needed to add some switches and really wanted the factory look of the upfitters. Slapping a generic toggle or rocker on this new fancy dash didn't seem right. I also really wanted the fuse block kit that comes with the kit as well as the terminals for the battery box under the hood.

So I figured I'd take a gamble and give it a try. Found a relatively cheap kit on ebay. Wrong color which doesn't matter cause the dash panel diffenitly wasn't going to work on a ZR2. The kit was around 200.

The wiring is almost plug in play. All the components plug in and bolt up just like the previous years minus the dash panel of course. The one hick up on the wiring is the ignition wire and the back lighting wire are missing from the 14 pin plug under the dash. Same connector, just is missing those pins. Pin 3 (yellow wire) is back lighting and pin 13 (violet) is ignition wire.

All I did to resolve that was run an ignition wire over to the harness and clip it into both those wires on the upfitter harness. The other issue is mounting location for the switches themselves. I ended up adding some length to the switch harness and mounting my switches in the center console under the climate controls. That just seemed to be the best spot where it fit and I only had to cut into a single trim piece.

It's diffenitly not just plug and play, but it's not to hard. Love the fact the switches match the factory look. I also how clean it makes the connections under the hood in the battery box. The 4ga wire there where the plow connection would be is for my on-board air compressor. HTH!
hey wanted to share something interesting I stumbled upon on the owner's manual about upfitter switches, sooner or later GM upfitter switches will be available for our refreshed 2022 dash heres an image below on how it might look which is very interesting how you also mounted your switches!

upfitter switches .JPG
 
Hard to say I guess. I don’t think it’s very hard. It was a bit of work when I did it because I didn’t know if it would work, if the wiring was the same or even where/if the switch would fit. I think if going in to it knowing the plug under the dash is the same and only 2 wires on the plug are different and which two at that. Also knowing where the switch will fit. should make it easier. Everything under the hood connects just like it would on a 21 model. So you can literally follow the instructions on that part.

but you do have to remove a few dash panels. you also have to cut a hole for the switch and you have to extend the wire harness for the switches themselves. So it’s not just plug and play. but I’d say anyone who has installed some aftermarket lights before could handle it. I should have taken more Pictures as I was doing it. I really didn’t know if it was even going to work though, lol.
If anyone gets in to it and has trouble, just ask and I’ll try to help you out best I can.

One small issue…
I’ve pretty much done the same setup as you, my upfitter switches are working well, I have them controlling my compressor, horn relay, light bar, and dash cams. I wired all this up in one go including additional wiring for two pressure sensors for my tank/compressor setup, gauge power, relays for grille led blade, relay for the horn, radar detector so I’m pretty sure a bad ground somewhere is the culprit. The issue I am having is that only one indicator light on the switches will power on, or at least bright enough I can see it, at a time. So if any one switch is on it’s indicator comes on, if I turn on any second switch then no indicator lights seem to be illuminated. The light from the first switch power on goes out. Everything else functions perfect, including the button illumination and dimming. Just curious if you saw this issue. The only logical thing I thing it could be is that my extension wire for the switch ground circuit has some resistance some how. I might either redo that wire or tap it at the switch connector and run a new ground to the frame. I would have liked to just get some new terminal connectors and run new wires for that part of the harness but I just kind of took the path of least resistance at the moment and cut the wire harness and soldered in extensions to each wire.
My switches do the same thing with the indicator lights. With one switch on, the indicator lights up. But with two or more on the indicator lights don't light up. I actually didn't even notice it at first. I wasn't actually using more then one switch at a time and when I tested them, I just clicked each one off and on lol.

That was sort of my thinking also. That maybe with the extended wire harness is to much resistance for multiple indicator lights. That seems odd that just a couple foot of wire would drop the voltage that much to not run a couple small leds though. I had planned on trouble shooting it, I just haven't bothered with it since everything seems to work perfectly other then that. The fuse block is powered directly from the wire to the battery and the only pins on the plug under the dash that are different are the two I mentioned earlier in this thread that are keyed power and back lighting. With both of those connected to 12v and the main power going to the battery. I can't really see how it could be anything else but the extended wire harness. If that is the problem. My only guess for the fix would be to replace either that wire or just all of them between the fuse block and the switch panel with a slightly larger gauge wire.

The LEDs being wired in parallel could make it more difficult to light all 5 with a bad ground. I’m not sure how much voltage is on the indicator light circuit from the bcm. I’m going to just tap the ground wire at the switch connector and run a ground wire straight to ground rather than bust open the harness and redo the wiring and see if that helps. If that doesn’t help I might try running another power supply to the indicator light circuit at the switch. It’s not a big deal but it bothers me now that I noticed it. :)
 
The LEDs being wired in parallel could make it more difficult to light all 5 with a bad ground. I’m not sure how much voltage is on the indicator light circuit from the bcm. I’m going to just tap the ground wire at the switch connector and run a ground wire straight to ground rather than bust open the harness and redo the wiring and see if that helps. If that doesn’t help I might try running another power supply to the indicator light circuit at the switch. It’s not a big deal but it bothers me now that I noticed it. :)
Post back if you figure it out. I'd rather all the indicators work right. But it hasn't really bothered me. After doing the bags, train horns and on-board air. Doing the upfitter switches wiring up a lock actuator to my bed cover. Replacing all the speakers, adding amps and a DSP then tuning everything. Plus a few other odds and ends. I sorta said good enough and haven't messed with anything else on the truck, lol. Especially since nothing is for our trucks, so everything had to be figured out from scratch.
 
  • Like
Reactions: AXE
Maybe you need a new relay or one that can handle more juice when you're using multiple accessories!
 
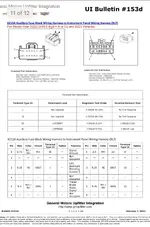
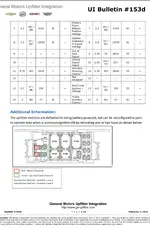
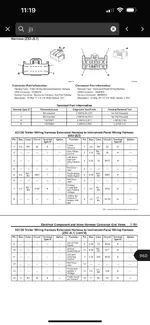
So I got to looking at my indicator lights and I could have caught this earlier, but the answer is in the upfitter manuals. Our ZR2’s have X213B connector as part of the trailering package. It is very similar to the X213A, auxiliary fuse block connector but only has pins 1,5,7, and 14. So no wire for run/crack voltage, backlighting or indicator lights. When I did the install I ran a pigtail from the x213 connector pin 3 and 13 to the BCM to tap the circuits needed for those pins. So I think that only 1 indicator light would light with a little back power from the relay circuit. Anyways I ran a third pigtail from pin 11 to the BCM for the indicator circuit and they function as intended now. Another thing I found…I was looking to order a second set of switches that I could repaint and laser etch new backlit labels into to match my setup and I found that gm parts now shows a switch panel and auxiliary fuse box and harness for the refreshed 22’s. So the harness would not need to be extended and the switches fit the console. I’m sure they also have a precut lower instrument panel but I could not find it. I can post part numbers if anyone is interested, and if anyone needs the details on which connector/pins to tap for the missing upfitter pins I can write up what I did for that as well.
 

Attachments

  • 00D298DB-A64E-4A1D-8882-EB9305033D24.jpeg
    00D298DB-A64E-4A1D-8882-EB9305033D24.jpeg
    79.7 KB · Views: 207
  • 02F12C12-DED5-4C5A-842C-20DEA655DF6E.jpeg
    02F12C12-DED5-4C5A-842C-20DEA655DF6E.jpeg
    41.6 KB · Views: 211
  • A2C82771-5159-40AA-A990-D3A799F4FFF0.jpeg
    A2C82771-5159-40AA-A990-D3A799F4FFF0.jpeg
    199.4 KB · Views: 204
  • 80D421D6-CCC3-4E80-95A6-6E17779CE758.jpeg
    80D421D6-CCC3-4E80-95A6-6E17779CE758.jpeg
    179.2 KB · Views: 176
  • F1F6EFD3-CDD2-4FE1-AFE6-1A643AC21D29.png
    F1F6EFD3-CDD2-4FE1-AFE6-1A643AC21D29.png
    62.4 KB · Views: 190
So I got to looking at my indicator lights and I could have caught this earlier, but the answer is in the upfitter manuals. Our ZR2’s have X213B connector as part of the trailering package. It is very similar to the X213A, auxiliary fuse block connector but only has pins 1,5,7, and 14. So no wire for run/crack voltage, backlighting or indicator lights. When I did the install I ran a pigtail from the x213 connector pin 3 and 13 to the BCM to tap the circuits needed for those pins. So I think that only 1 indicator light would light with a little back power from the relay circuit. Anyways I ran a third pigtail from pin 11 to the BCM for the indicator circuit and they function as intended now. Another thing I found…I was looking to order a second set of switches that I could repaint and laser etch new backlit labels into to match my setup and I found that gm parts now shows a switch panel and auxiliary fuse box and harness for the refreshed 22’s. So the harness would not need to be extended and the switches fit the console. I’m sure they also have a precut lower instrument panel but I could not find it. I can post part numbers if anyone is interested, and if anyone needs the details on which connector/pins to tap for the missing upfitter pins I can write up what I did for that as well.
Nice! I didn't realize pin 11 was missing also. Ill have to also run a jumper there. Thanks for sharing.

I would diffenitly post up the part numbers for the updated switches. It would help anyone who stumbles across this thread on what options they have. Especially if the new switches are just plug and play. Were you able to find where the new version is supposed to mount? The knee panel on the refreshed are much different. I didn't even see a place under trim that would accommodate a switch in that area.
 
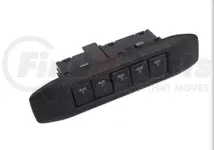
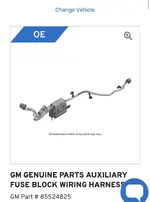
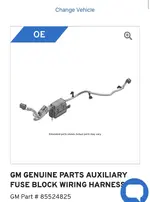
Installed the new switch panel last night. It still mounts on the center lower instrument panel. The new instrument panel fuse box and harness goes directly to that location without extending any wires on the harness. On our trucks you still have to tap power for the 3 pins on the upfitter connector but otherwise these updated parts make it plug and play. I went the extra mile and refinished the buttons on my switch and laser cut new labels on them for a little custom touch. The updated parts I have found are:

ACDELCO 84726943 - Multi-Purpose Switch - Auxiliary​

F Harness - GM (85524825)​


I have not found the precut instrument panel yet but I’m sure it’s out there.
 

Attachments

  • CE258B8F-EF93-4993-A867-9B35DB521CC4.jpeg
    CE258B8F-EF93-4993-A867-9B35DB521CC4.jpeg
    264.2 KB · Views: 223
  • C18ACF62-83DE-4770-BBE7-4140A2B8D357.jpeg
    C18ACF62-83DE-4770-BBE7-4140A2B8D357.jpeg
    94.8 KB · Views: 218
  • 0369F4EE-F944-40E2-90BC-A8157F0E62B8.jpeg
    0369F4EE-F944-40E2-90BC-A8157F0E62B8.jpeg
    41.6 KB · Views: 214
  • 5949D485-5673-48B6-AB00-27F18349D8F3.jpeg
    5949D485-5673-48B6-AB00-27F18349D8F3.jpeg
    79.7 KB · Views: 212
Installed the new switch panel last night. It still mounts on the center lower instrument panel. The new instrument panel fuse box and harness goes directly to that location without extending any wires on the harness. On our trucks you still have to tap power for the 3 pins on the upfitter connector but otherwise these updated parts make it plug and play. I went the extra mile and refinished the buttons on my switch and laser cut new labels on them for a little custom touch. The updated parts I have found are:

ACDELCO 84726943 - Multi-Purpose Switch - Auxiliary​

F Harness - GM (85524825)​


I have not found the precut instrument panel yet but I’m sure it’s out there.
Looks good! How it should be from the factory! They know we need this shit!
 
Nice. So the new harness is longer, but it still has the same issue with the same three pins. Is the plug the same on the new switch? They might not have a panel out yet. I'm sure eventually GM will offer a Upfitter switch kit for the refreshed trucks. Who knows when though. Especially with how slow inventory and parts are to get now. People are still waiting on retrofits from early 22 trucks.
 
  • Like
Reactions: AXE
Upfitter switches! So, I figured I'd share just in case anyone was looking to add these to your ZR2. Gm doesn't offer any upfitter switches for the refresh. I needed to add some switches and really wanted the factory look of the upfitters. Slapping a generic toggle or rocker on this new fancy dash didn't seem right. I also really wanted the fuse block kit that comes with the kit as well as the terminals for the battery box under the hood.

So I figured I'd take a gamble and give it a try. Found a relatively cheap kit on ebay. Wrong color which doesn't matter cause the dash panel diffenitly wasn't going to work on a ZR2. The kit was around 200.

The wiring is almost plug in play. All the components plug in and bolt up just like the previous years minus the dash panel of course. The one hick up on the wiring is the ignition wire and the back lighting wire are missing from the 14 pin plug under the dash. Same connector, just is missing those pins. Pin 3 (yellow wire) is back lighting and pin 13 (violet) is ignition wire.

All I did to resolve that was run an ignition wire over to the harness and clip it into both those wires on the upfitter harness. The other issue is mounting location for the switches themselves. I ended up adding some length to the switch harness and mounting my switches in the center console under the climate controls. That just seemed to be the best spot where it fit and I only had to cut into a single trim piece.

It's diffenitly not just plug and play, but it's not to hard. Love the fact the switches match the factory look. I also how clean it makes the connections under the hood in the battery box. The 4ga wire there where the plow connection would be is for my on-board air compressor. HTH!
imo, looks factory.
 

Most Member Reactions

Back
Top