Baja Designs Squadron Lights

Looks good! I make Kydex holsters from time to time. .125 kydex is some pretty thick stuff lol. Atleast when it comes to holsters. .080 is kind of the standard for holsters. I think the thickest I've used is .093. Kydex is cool stuff. I've used it for other things a few times. Heck I made a shelf grid for a gun safe door using it.
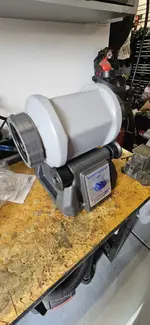
.125 is pretty heavy, you'd need a hell of a press to form it for a holster. I have one hunting holster for my Sig P220 Hunter 10mm that is heavy Kydex, but wouldn't want it for standard carry. It's made by Red River Tactical and is very high quality.
 
Last edited:
That
I got some .125 Kydex material and fabbed a replacement trim piece for the light to mount flush with surface of bumper. Kydex color and texture match the bumper very well. It took a lot of time to cut, trim, and sand edges to get the fitment pretty good. Still have a little more tweaking to do to beveled the inside edges and will polish the edges with a Dremel to finish it off.

The flush mount light bolted into the Kydex very solidly which should make it more durable.

I am probably going to redo the light mount bracket for the third time. I am not happy with how it supports the light from behind. Need a little more flexibility to get it to hold the Kydex firmly to bumper. I guess the 3rd time is the charm.

Overall, happy with progress, in spite of it taking a lot of time.
That looks really nice. I think you've got something there.
 
Looks great. Plan to try the same thing and have my Squadrons on the way. Please share with us what the bracket you fab up for the front looks like. Thank you for sharing!
 
  • Like
Reactions: AXE
I'll plan to use the light mounts that came with the squadron lights. Then I'm cutting g 3"x3" square about 1" high HDPE base to attached the light brackets to the bumper mount. It'll be pretty solid and the deralin should help absorb some shock and vibration.

HDPE is a polyurethane material that is used for a lot of spacers and bushings. It's used for kitchen cutting boards too.

Something like this from Amazon. Might have to cut it or sand it down.


The biggest concern I have now is this mount will limit tilting the light the up and down for adjustability, since it is mounted to the back plate. You have just a little play to get it right. I'm worried a about the light pointing down too low.
 
Last edited:
Got my mounts mostly done today. Still have a few tweaks to make, they are solid ass country.......at least in the driveway.

You have to install the block first to the bumper and the the light to the block. So you have to get your hand through the bottom of bumper. If you already have a winch mounted, this is not gonna be viable, unless you remove the winch. Nothings perfect I guess.

Should have final fitting done tomorrow. Then some testing.
 

Attachments

  • 20240309_173045.webp
    20240309_173045.webp
    220.7 KB · Views: 39
  • 20240309_173053.webp
    20240309_173053.webp
    206.3 KB · Views: 39
  • 20240309_173101.webp
    20240309_173101.webp
    166.6 KB · Views: 37
Last edited:
Made a couple more adjustments to the base. They mount up really solid, but I still feel like the stock Baja Designs bracket need a larger base to support it and give me some additional positioning flexibility.

I'll give it about 9 out of 10. Might try to improve after some testing.
 

Attachments

  • 20240310_144420.webp
    20240310_144420.webp
    234.7 KB · Views: 32
I got them bolted in, which proved to be very tedious with the large bases and adjustments that need to be made.

When I got them fully tighted they tended to pull the light bezels up a little so there's a tad more gap on the bottom versus the top. I thought it was going to be the opposite.

Overall fit was pretty good and they look pretty decent for doing everything by hand. It took me considerably longer than I thought, but think it is worth the effort. The mateterial looks very high quality and just like factory. I don't think anybody could tell it wasn't........at least from a galloping horse.

Gonna test them out at night and see what the light looks like. Then decide if they need more work.

Here's how they look.in the light
 

Attachments

  • 20240310_170704.webp
    20240310_170704.webp
    269.6 KB · Views: 44
  • 20240310_170654.webp
    20240310_170654.webp
    268.3 KB · Views: 45
  • 20240310_170641.webp
    20240310_170641.webp
    249.9 KB · Views: 49
  • 20240310_170635.webp
    20240310_170635.webp
    217.9 KB · Views: 49
  • 20240310_170549.webp
    20240310_170549.webp
    209.8 KB · Views: 50
Here's a couple shots of lights at night. They look good when all on. Spots are a little low, but floods provide nice ditch light.

There is about 2-3° of downward cant in the front bumper. That makes the spots hit the ground about 35 to 40 feet ahead. I think I can adjust them about that much upwards, but probably not much more. I also have my truck nearly leveled.

Pictures are no aux lights, low beam/aux, high beam/aux left to right. I think the difference was a little better in person than photos.
 

Attachments

  • 20240310_203508.webp
    20240310_203508.webp
    156.1 KB · Views: 33
  • 20240310_203755.webp
    20240310_203755.webp
    46.9 KB · Views: 33
  • 20240310_203810.webp
    20240310_203810.webp
    73.8 KB · Views: 31
  • 20240310_203848.webp
    20240310_203848.webp
    76.7 KB · Views: 34
Last edited:
Here are the images of the bezel and block from my scanner. I think they should print full scale at 8.5x11 inch on a printer.

What I did to get this pattern was flip the stock bezels over and trace them on the kydex. I cut them a tad wider to be able to sand and hand fit. I would recommend doing a test on a piece of cardboard or poster board first to make sure your close or you'll waste your kydex.

I found using one of those oscillating tools with wood/drywall blade was easiest way to cut kydex cleanly. Band saw or jig saw would have been good too. I used a 3 inch hole saw to cut out the center hole for light, then a die grinder to sand out the corners.

The block was 30 mm in height.
 

Attachments

Last edited:
Sorry to bother you Axe, but a couple questions. Where did you get the HDPE for your block? If my 'guess' dimensions are correct the hole through the AEV bumper is about 3/4" off center and you moved the center post bracket hole 'forward' about 1 1/2". You already shared block height at 30 mm which would make it about 1 3/16" elevation. Planning to try Squadron Pro pod first to see the look and compare to your awesome Kydex mount. Thanks
 
  • Like
Reactions: AXE
Sorry to bother you Axe, but a couple questions. Where did you get the HDPE for your block? If my 'guess' dimensions are correct the hole through the AEV bumper is about 3/4" off center and you moved the center post bracket hole 'forward' about 1 1/2". You already shared block height at 30 mm which would make it about 1 3/16" elevation. Planning to try Squadron Pro pod first to see the look and compare to your awesome Kydex mount. Thanks
No bother, always willing to try and help.

I got the block on Amazon. It was kinda spendy. I thought I had some, but it was too small so bought this block and it was a little thick. I have a belt sander so it goes pretty fast. If you don't, it would be real PIA to get them sized and cleaned up.

My first setup was just a fabricated metal mount. It worked ok, but felt like it would vibrate some being so tall. I may go back to the drawing board on that mount, cause I think I can get more adjustability.

Acetal Copolymer Plastic Sheet 1.25" x 8" x 8" - Black Color https://a.co/d/fkYyCx5
 
I did a little bit more adjusting today and got the lights shining evenly and lifted up maybe 1+ degree. I still think the can't in the bumper is a little much and this flush mount does limit your adjustability a little too much. The only way to adjust further is a spacer behind lower light bezel screws or lower the block and move it forward a couple mm and tilt the whole kydex sheet. I think that would make it look sloppy so I'm gonna run it and decide if it needs further work.

Also managed to polish up 1000 rounds of .45ACP brass on the rotary wet tumbler. Gonna have to get busy on the Dillion soon.
 

Attachments

  • 20240316_164734.webp
    20240316_164734.webp
    187.6 KB · Views: 37
  • 20240316_170103.webp
    20240316_170103.webp
    181.7 KB · Views: 37
It may be worth mounting behind the stock bezels with a 3 inch light and see if you like the look and fit. At least you'll have full adjustability. You'll sacrifice a clean look and some lost light behind the bumper.
 
Tested the lights after adjusting upward. It's a little better, but still needs to be raised up a couple degrees to be prefect for flat roads.

Lights do a great job of putting light in the ditches and filling in the low and high beams.

I think it would work well if you were offroading in the dark as it puts plenty of light right in front of the truck where it matters on slower technical stuff.

Here's a few more photos on a flat road low beam, low beam/aux, high beam/aux.
 

Attachments

  • 20240316_211128.webp
    20240316_211128.webp
    80.5 KB · Views: 27
  • 20240316_211121.webp
    20240316_211121.webp
    75.1 KB · Views: 27
  • 20240316_211110.webp
    20240316_211110.webp
    65.2 KB · Views: 27
Thanks AXE!! Decided to give this look a try. Still did not hook up wiring yet.
 

Attachments

  • IMG_2626.webp
    IMG_2626.webp
    416.4 KB · Views: 40
  • IMG_2627.webp
    IMG_2627.webp
    225.8 KB · Views: 40
  • IMG_2629.webp
    IMG_2629.webp
    327.7 KB · Views: 38
Last edited:
Thanks AXE!! Decided to give this look a try. Still did not hook up wiring yet.
Looks good. I think the main benefit to that is you can get full adjustability. I'd be interested in seeing your light pattern at night on a flat road. I think if you raise them up a tad more than mine it might be better to get the spots further ahead. Floods seem to get plenty of light to the side regardless.

Also if you move the light to the edge towards center of bumper, you might get less light blockage from the bumper ring and d ring shackle.
 
Last edited:
I had been putting off locating my front and rear light switches. Mainly cause I didn't like the mounting options by the headlight switch. That's where I wanted them, but there's no room behind the panel due to the subframe.

I ended up going right below the headlight switch on the fuse panel. That is about the only place that is easy to reach and you can tap a hole in the subframe without wires and hardware in the way.

You end up cutting a hole right through the fuse panel and it messed up the fuse diagram. I would take a picture of the fuse diagram and put a printout in your glove box.

Overall, I like how they turned up. You could go slightly higher or lower on the fuse panel, but I kind of centered them, partly cause one of my wire harnesses didn't have as much slack.
 

Attachments

  • 20240413_124955.webp
    20240413_124955.webp
    364.8 KB · Views: 34
  • 20240413_124925.webp
    20240413_124925.webp
    249.9 KB · Views: 34
  • 20240413_131413.webp
    20240413_131413.webp
    248.1 KB · Views: 33
  • 20240413_131440.webp
    20240413_131440.webp
    361.4 KB · Views: 33
Last edited:
Back
Top