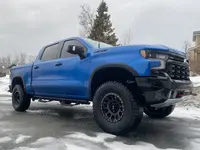
šŸ› ļø Member Build BurBurBlue ZR2 Build

This prefix only appears in the Member Builds section.

AK-ZR2

Member
Joined
Apr 1, 2023
Messages
29
Reaction score
92
Location
Wasilla, Alaska
Well, joined a little after Iā€™ve done a few minor things;
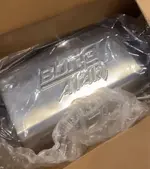
-Borla Attack Muffler single dump in front of the passenger rear wheel (absolutely beastly)
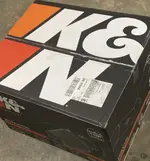
-K&N Black Hawk cold air intake system
-Blacked out Badges for disco points
-Ronin Bullet antenna, cuz ā€˜murca
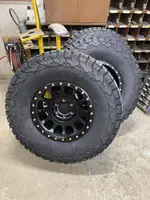
-method 305 17ā€™s 0 offset with BFG ATā€™s 35x12.5 (hopefully no spacers needed)
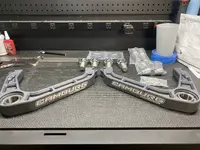
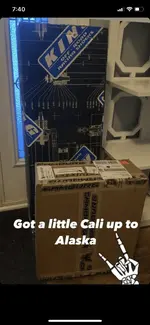
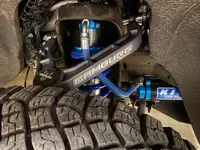
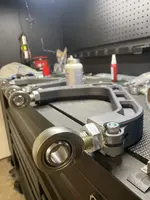
-Camburg KINETIC UCA heim joint and uniball cup (max caster is required when aligning)
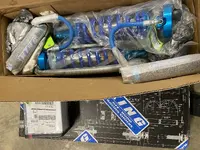
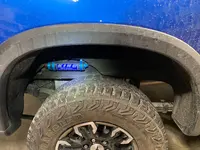
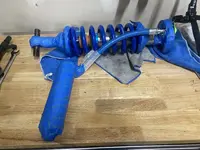
-KING 2.5ā€ shocks all around with compression adjusters on all four reservoirs
-clear bra and ceramic coated, becauseā€¦ wellā€¦ Alaska.

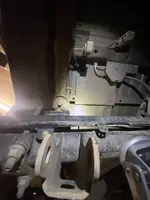
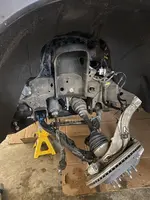
Solo garage install for the UCAā€™s and shocks took about 8 hours in total. Biggest pain was mounting the reservoirs (there was a factory document inside the frame blocking a hole for the mountā€¦ lol)

Everything torqued to spec which probably took the longest, especially to reach the third bolt on top of the front shock bucketsā€¦

Tires and wheels will be put together and balanced tomorrow for pick up, and Iā€™ll be bringing it to get the alignment Wednesday.

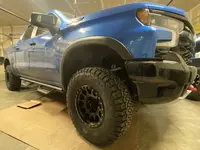
Have to get the wheels and tires on at the house since the stock set up is this šŸ‘ŒšŸ» close to rubbing at static heightā€¦

Should be all good to go Wednesday and Iā€™m pretty excited to get it going and dial the shocks in!
 

Attachments

  • 6CAFAFA1-80E3-425C-B83B-08E24A3B67B4.jpeg
    6CAFAFA1-80E3-425C-B83B-08E24A3B67B4.jpeg
    138.4 KB · Views: 300
  • EFC12BE4-5659-4C93-8BAF-4DB42AB14A46.jpeg
    EFC12BE4-5659-4C93-8BAF-4DB42AB14A46.jpeg
    87.1 KB · Views: 193
  • D8AD71B2-F138-4587-AB83-9570FB3610B9.jpeg
    D8AD71B2-F138-4587-AB83-9570FB3610B9.jpeg
    429.2 KB · Views: 165
  • 3765B24D-E92A-43BF-882D-6A47CF6AA009.jpeg
    3765B24D-E92A-43BF-882D-6A47CF6AA009.jpeg
    436.9 KB · Views: 165
  • 74EBC701-8CBD-45B0-B925-C7C46AA32E6F.png
    74EBC701-8CBD-45B0-B925-C7C46AA32E6F.png
    351.4 KB · Views: 156
  • 8DDA572B-1FA6-4FE1-AC0B-DE2B5FD646CD.jpeg
    8DDA572B-1FA6-4FE1-AC0B-DE2B5FD646CD.jpeg
    95.1 KB · Views: 184
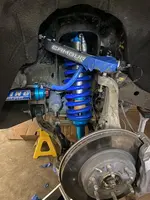
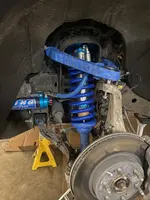
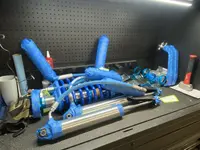
Hereā€™s a little bit of the progress, started by setting up the UCAā€™s to spec
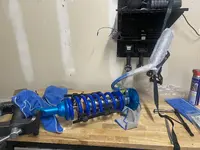
compressed the coils to turn about 9 times over to get the desired ride height (5 full left turns = 1ā€ height)
Wrapped most anodized parts for install in painters tape to help save it from scratches or dings during install
Always takes a little longer for the first side but it wasnā€™t too bad - hardest part was getting the the third bolt on top of the shock bucket - there is a plastic mount on top of both sides for wires n such
Then the upper went in, followed by the shock, which made getting the upper arms torqued to spec WAY easier.
Then getting the uniball greased up and sealed with the o-ring cap.

Rear end was substantially easier, the one main ā€œfrustratingā€ part was getting the reservoir between the bed and the frame and cutting out the felt for it to pinch mount on the rear two (replaced) bolts that hold the fender liner in.
 

Attachments

  • 0B9369B3-650D-473C-9EDB-DD2338053218.jpeg
    0B9369B3-650D-473C-9EDB-DD2338053218.jpeg
    311.4 KB · Views: 169
  • 3216D684-2620-42C3-85C1-D7F9B79A85D8.jpeg
    3216D684-2620-42C3-85C1-D7F9B79A85D8.jpeg
    169.5 KB · Views: 176
  • BE85C8C2-0874-4989-83BF-9D881D020D49.jpeg
    BE85C8C2-0874-4989-83BF-9D881D020D49.jpeg
    329.9 KB · Views: 168
  • D10FCB4B-B3C3-4AC1-8816-09F96A2BBD32.jpeg
    D10FCB4B-B3C3-4AC1-8816-09F96A2BBD32.jpeg
    373.7 KB · Views: 172
  • 59E9E25E-7820-4B3A-A1EE-0A4F7D94B8B7.jpeg
    59E9E25E-7820-4B3A-A1EE-0A4F7D94B8B7.jpeg
    355.1 KB · Views: 168
  • AF2D8EF8-E0A7-4ADC-9689-82EACB605910.jpeg
    AF2D8EF8-E0A7-4ADC-9689-82EACB605910.jpeg
    362.9 KB · Views: 157
  • CD877BFD-1D80-4A38-8248-C39A4ABC5684.jpeg
    CD877BFD-1D80-4A38-8248-C39A4ABC5684.jpeg
    251.4 KB · Views: 154
  • D00ECD50-386A-4C4C-9869-EA4DED5B0646.jpeg
    D00ECD50-386A-4C4C-9869-EA4DED5B0646.jpeg
    363.3 KB · Views: 153
  • 0ACDAF54-F19E-4E73-89DE-59DF20F4C16F.jpeg
    0ACDAF54-F19E-4E73-89DE-59DF20F4C16F.jpeg
    309.4 KB · Views: 149
  • 104CC8B8-DBDA-4BB5-BC63-2668E50F37E3.jpeg
    104CC8B8-DBDA-4BB5-BC63-2668E50F37E3.jpeg
    232.2 KB · Views: 170
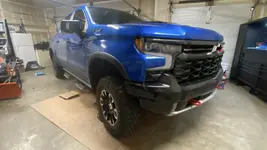
Sitting pretty level at the moment, but itā€™s only been dropped from the floor jack, so it will be interesting to see how it sits after the alignment šŸ¤™šŸ»
 

Attachments

  • 75EC15DB-7A6B-45B5-A528-77DE2B10BD61.jpeg
    75EC15DB-7A6B-45B5-A528-77DE2B10BD61.jpeg
    154.5 KB · Views: 133
Wheels and tires are put together with GM TPS sensors! Putting them on when I get home from work and hopefully wonā€™t need wheel spacers. Not holding my breathā€¦ lol
Method 305 17ā€™s 0 offset, BFG 35x12.5ā€™s
 

Attachments

  • DA810D09-64F4-4454-8055-64403E565321.jpeg
    DA810D09-64F4-4454-8055-64403E565321.jpeg
    395.2 KB · Views: 112
Wheels and tires are put together with GM TPS sensors! Putting them on when I get home from work and hopefully wonā€™t need wheel spacers. Not holding my breathā€¦ lol
Method 305 17ā€™s 0 offset, BFG 35x12.5ā€™s
Don't forget your sawzall!
 
Don't forget your sawzall!
None needed! lol they cleared the rotor by only a space calipers could measure šŸ˜‚šŸ˜®ā€šŸ’Ø the fitment is absolutely perfect with the wheel and tire combo. Just a smidge of rub to eliminate too! I donā€™t understand it, but somehow these kind of things just work out for meā€¦ couldnā€™t be happier with the result šŸ¤˜šŸ»
 

Attachments

  • FF174C3D-6D9D-4834-A105-C6F3DB25D1B1.jpeg
    FF174C3D-6D9D-4834-A105-C6F3DB25D1B1.jpeg
    199 KB · Views: 262
  • 411C4A32-AFEA-4D2F-A84A-9F1E066ED27E.jpeg
    411C4A32-AFEA-4D2F-A84A-9F1E066ED27E.jpeg
    335.8 KB · Views: 262
  • B67A5026-1EF2-4A3D-8CF0-6C64AB99961B.jpeg
    B67A5026-1EF2-4A3D-8CF0-6C64AB99961B.jpeg
    343 KB · Views: 261
None needed! lol they cleared the rotor by only a space calipers could measure šŸ˜‚šŸ˜®ā€šŸ’Ø the fitment is absolutely perfect with the wheel and tire combo. Just a smidge of rub to eliminate too! I donā€™t understand it, but somehow these kind of things just work out for meā€¦ couldnā€™t be happier with the result šŸ¤˜šŸ»
whats a smidge of rub?? i like your setup but dont wanna cut or modify.
 
  • Like
Reactions: AXE
Looks sick! If I do aftermarket wheels, they will definitely be 17's. Well done!
Thank you! Not a single person was able to let me know if they would fit, but with some hard headed commitment, I was excited that they did! I had 1/4in spacers on standby just incase.
 
A smidgen of rub = a lot of rub when you're off road!

Trimming was the best mod I've done and I can run the setup I want. These front wheel wells have a very poor design and specs for an off road rig. The rear wheel well is actually larger.
 
whats a smidge of rub?? i like your setup but dont wanna cut or modify.
Nothing that engages any wheel well withā€¦ gusto. Itā€™s more like the tread skims across the front and back of the well, but only on the front left. Should take less than a half hour to clear everything at bump (full compression) on both sides
 
A smidgen of rub = a lot of rub when you're off road!

Trimming was the best mod I've done and I can run the setup I want. These front wheel wells have a very poor design and specs for an off road rig. The rear wheel well is actually larger.
Trimming it will be the least amount of work Iā€™ll have put in to this entire project, and I absolutely agree. They could have done A LOT better with the wheel well! The front caster is also supposed to be close to maxed on this as well, so Iā€™m looking forward to seeing how she handles, the drive to get the alignment was nothing less than a teaseā€¦ I cannot wait to rip in it
 
  • Like
Reactions: AXE
Chevy's are like a bush, they all look and perform better with a little trimming!
 

Attachments

  • SmartSelect_20230412_171430_Google.jpg
    SmartSelect_20230412_171430_Google.jpg
    23.9 KB · Views: 53
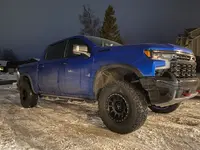
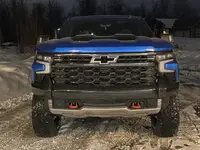
Thatā€™s a wrapā€¦ for now. 100% preforms as I believe it should have from factoryā€¦ not a minor difference, I was really hoping it wouldnā€™t be. It truly was worth the time and effort. Leveled out with suspension, added 3ā€ of wheel travel (safely without fear or worry of CV fail) and full adjustable compression in all four corners to handle any terrain. Could not be more happy with this build.

More minor modifications to really complete what Iā€™m going for, may be a while, may be sooner rather than later! We will see
 

Attachments

  • D17856B9-F4EC-4F5F-BF39-EA3143EBE0F6.jpeg
    D17856B9-F4EC-4F5F-BF39-EA3143EBE0F6.jpeg
    299.2 KB · Views: 191

Most Member Reactions

Latest Posts

Back
Top